 My Cart
 My Account

How to Replace and Properly Position a Gas Lantern Thermocouple
A gas lantern is a relatively simple fixture, but a few important components work behind the scenes to keep it operating properly. One of those components is the thermocouple.
If your gas lantern will light but will not remain lit after you release the valve, the thermocouple is one component worth inspecting. Because it serves an important safety function, its condition and positioning matter.
The good news is that replacing a thermocouple lead is a fairly straightforward maintenance task.
In this guide, we’ll explain what the thermocouple does, why its position matters, and how to replace the thermocouple lead in a gas lantern.
What Does a Thermocouple Do in a Gas Lantern?
The thermocouple is a safety device associated with the lantern’s gas valve.
When the lantern is operating, the thermocouple senses heat from the flame. Once it becomes hot enough, it allows the valve to remain open so the lantern can continue operating.
That is why, when lighting a gas lantern, you may need to continue holding the valve in for approximately 10 seconds. This gives the thermocouple time to heat before you release the valve.
If the thermocouple is worn or improperly positioned, the lantern may have difficulty remaining lit.
Thermocouple leads will also need to be replaced periodically. Fortunately, the replacement itself can usually be completed with basic hand tools.
Before You Begin: Let the Lantern Cool
Never begin working inside a lantern immediately after it has been operating.
Turn the lantern completely off and allow it to cool before removing glass or handling components inside the fixture. We recommend allowing approximately an hour so the lantern and its internal components are no longer hot.
Once everything has cooled, you can begin accessing the thermocouple.
Step 1: Remove the Glass
Start by removing the glass from one of the side panels.
You can also remove the front glass if you would like additional room to work. The goal is simply to give yourself comfortable access to the thermocouple and its connections.
Set the glass somewhere safe while you work.
Step 2: Loosen the Thermocouple
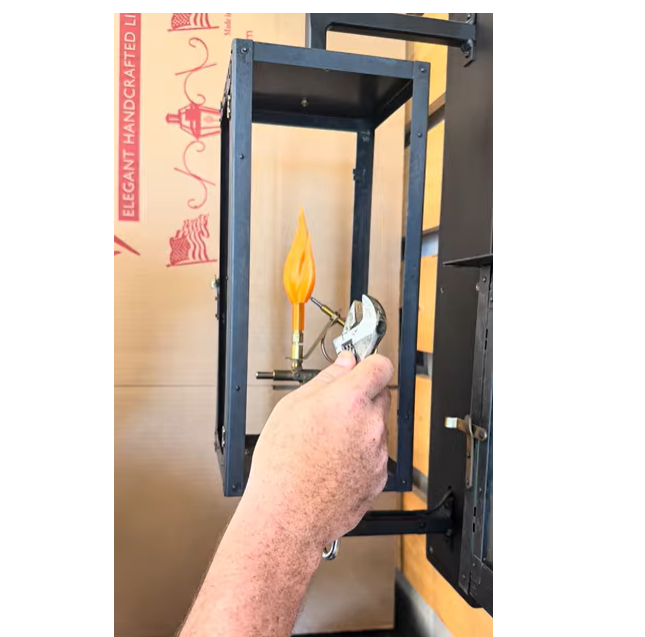
Using a standard wrench, locate the nut securing the thermocouple.
There are two nuts involved in securing the assembly. Begin by loosening the accessible nut with the wrench. You should only need enough pressure to break it loose.
Once loosened, you can finish unscrewing it by hand.
Keep the removed nut somewhere safe—you’ll need it when installing the replacement thermocouple.
Step 3: Disconnect the Old Thermocouple Lead
With the first connection released, gently pull the thermocouple out to access the connection behind it.
You’ll find another nut securing the thermocouple lead at the back.
Use your wrench to carefully break this connection loose. After the first couple of turns, you should be able to continue unscrewing it by hand.
The old thermocouple lead can then be removed.
Step 4: Install the New Thermocouple Lead
Take the replacement thermocouple lead and begin by positioning its nut approximately halfway down.
Next, connect the new lead at the rear connection where the previous thermocouple was removed.
Thread it into place by hand until it becomes snug.
Once it is seated, use your wrench to tighten it slightly—approximately another half turn, or until you feel adequate pressure.
The goal is a secure connection. There is no need to excessively tighten the fitting.
Step 5: Reinstall and Secure the Thermocouple
Feed the new thermocouple back through its opening.
Take the nut you removed earlier and thread it back into position. Tighten the assembly so the upper and lower connections compress against one another and hold the thermocouple securely.
Before reinstalling the glass, however, there is one particularly important detail to check.
Thermocouple Placement Is Critical
A new thermocouple will not do its job properly if it is positioned incorrectly.
The thermocouple needs to be close enough to the flame that it can sense the heat, but it should not sit directly in the flame.
Position it so the thermocouple is almost touching the flame and can receive sufficient heat from it.
This small adjustment matters. If the thermocouple cannot get hot enough, the safety valve may not remain open after you release it.
Take a moment to verify its position before putting the lantern back together.
Step 6: Replace the Glass and Relight the Lantern
Once the thermocouple is installed and properly positioned, replace the glass panels.
You can then relight the lantern according to its normal lighting procedure.
When lighting, continue holding the valve in for approximately 10 seconds. This allows the new thermocouple to heat sufficiently and keep the valve open.
Release the valve and confirm that the lantern continues operating normally.
How Long Does It Take to Replace a Gas Lantern Thermocouple?
For someone comfortable working with basic hand tools, replacing a thermocouple lead can be a relatively quick job.
Once the lantern is completely cool and accessible, the actual replacement may take approximately five to ten minutes.
The most important part isn’t speed. It’s making sure the connections are secure and the thermocouple is positioned correctly in relation to the flame.
Maintaining a Handcrafted Gas Lantern
Simple maintenance can help keep a gas lantern operating as intended.
At Flambeaux Gas & Electric Lanterns, we build our gas and electric lanterns by hand in Louisiana. Every copper lantern is cut, soldered, and finished by hand in our own workshop.
That approach to craftsmanship also means understanding how the individual components of a lantern work together.
Whether you’re replacing a thermocouple or simply checking its position, taking the time to do the job correctly helps ensure your gas lantern continues operating properly.
Explore Flambeaux Gas & Electric Lanterns to learn more about our handcrafted copper gas and electric lanterns.


